


Most people watch youtube movie but don't know that we communicate to you while you're uploading your video. If you'd normal video file can't upload but so large video file than need converter video file.(Uploading large files and resumable uploading) Do you want to upload video to youtube than would be read that most important business adverting place.
How to upload videos
The upload page offers a range of options from simple single upload functionality, to multiple file and webcam uploads. Drag and drop videos onto the page, or click Select files from your computer to begin.
After you have started an upload, you have a variety of ways to edit the details of your video directly on the page. Once your upload is complete, options such as sharing and selecting thumbnails are available directly on the page, and the Video Editor and Annotations editor are just one click away.
Click an area of the image to learn more about using this page

Increase your limit
All users have the ability to upload videos up to 15 minutes in length. You can attain the ability to upload longer length videos if:
- Your account is in good standing, as determined by the YouTube Community Guidelines.
- You verify your account with a mobile phone.
- Your account has no worldwide Content ID blocks on any content.
On the upload page, click the link to Increase your limit to be prompted to verify your account. Learn more here about longer length uploads.Upload
Click the large red icon, or the button to Select files from your computer. This will open a menu where you can choose which file you want to upload. Once you have located the file, select Open to begin the upload. Alternatively, you can simply drag files from your computer and drop them on the page to begin an upload.Upload multiple files
Begin by clicking Select files from your computer. This will open the menu in which you will select your file. To select multiple files, hold down your Command key while selecting the files. On some keyboards, the Command key is the same as the Apple key or the Windows key. All the videos you intend to upload should be highlighted. Once you have completed this, click the Open button.

Record from webcam
Click this box to begin directly recording a video using your webcam, or simply go to www.youtube.com/my_webcam.
 You must do the following to ensure that the YouTube Record from webcam feature works:
- Log into your YouTube account
- Ensure that you have a working webcam built into or connected to your computer
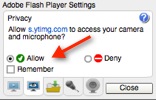
- Select allow if asked to permit YouTube to access your camera and microphone
Once you have followed these steps, you can begin to record your video and then upload it to YouTube directly. See here for more information on recording and uploading webcam videos.
Supported YouTube formats
YouTube supports a wide variety of the range of video and audio formats in use. You can get a quick overview of what may be an issue with your video's formatting by taking a look at the warnings and error messages that we communicate to you while you're uploading your video.
Here is a list of some well-known formats that YouTube supports:
- WebM files - Vp8 video codec and Vorbis Audio codecs
- .MPEG4, 3GPP and MOV files - Typically supporting h264, mpeg4 video codecs, and AAC audio codec
- .AVI - Many cameras output this format - typically the video codec is MJPEG and audio is PCM
- .MPEGPS - Typically supporting MPEG2 video codec and MP2 audio
- .WMV
- .FLV - Adobe-FLV1 video codec, MP3 audio
Here is a list of some common formats that YouTube does NOT support:
- Project files: No project files of any kind are acceptable. It is generally very easy to convert project files to a supported format.
- MSWMM and WLMP: You can easily convert these project files to .WMV.
- Audio files (MP3, WAV, etc.) and Image files (JPG, PNG, etc.): Convert these files to video slideshows.
Tips and notes:
- We prefer that you upload your video in the original format and in the highest quality possible.
- We prefer de-interlaced files.
- Audio and video lengths should be the same and audio should begin at the same time as the video.
- If you continue to experience Audio/Video issues with your upload, contact us and we may be able to help.
Most people watch youtube movie but don't know that we communicate to you while you're uploading your video. If you'd normal video file can't upload but so large video file than need converter video file.(Uploading large files and resumable uploading)
Do you want to upload video to youtube than would be read that most important business adverting place.
How to upload videos
The upload page offers a range of options from simple single upload functionality, to multiple file and webcam uploads. Drag and drop videos onto the page, or click Select files from your computer to begin.
After you have started an upload, you have a variety of ways to edit the details of your video directly on the page. Once your upload is complete, options such as sharing and selecting thumbnails are available directly on the page, and the Video Editor and Annotations editor are just one click away.
Click an area of the image to learn more about using this page
Increase your limit
All users have the ability to upload videos up to 15 minutes in length. You can attain the ability to upload longer length videos if:
- Your account is in good standing, as determined by the YouTube Community Guidelines.
- You verify your account with a mobile phone.
- Your account has no worldwide Content ID blocks on any content.
On the upload page, click the link to Increase your limit to be prompted to verify your account. Learn more here about longer length uploads.Upload
Click the large red icon, or the button to Select files from your computer. This will open a menu where you can choose which file you want to upload. Once you have located the file, select Open to begin the upload. Alternatively, you can simply drag files from your computer and drop them on the page to begin an upload.Upload multiple files
Begin by clicking Select files from your computer. This will open the menu in which you will select your file. To select multiple files, hold down your Command key while selecting the files. On some keyboards, the Command key is the same as the Apple key or the Windows key. All the videos you intend to upload should be highlighted. Once you have completed this, click the Open button.
Record from webcam
Click this box to begin directly recording a video using your webcam, or simply go to www.youtube.com/my_webcam.
You must do the following to ensure that the YouTube Record from webcam feature works:
- Log into your YouTube account
- Ensure that you have a working webcam built into or connected to your computer
- Select allow if asked to permit YouTube to access your camera and microphone
Once you have followed these steps, you can begin to record your video and then upload it to YouTube directly. See here for more information on recording and uploading webcam videos.
How to upload videos
The upload page offers a range of options from simple single upload functionality, to multiple file and webcam uploads. Drag and drop videos onto the page, or click Select files from your computer to begin.
After you have started an upload, you have a variety of ways to edit the details of your video directly on the page. Once your upload is complete, options such as sharing and selecting thumbnails are available directly on the page, and the Video Editor and Annotations editor are just one click away.
Click an area of the image to learn more about using this page

Increase your limit
All users have the ability to upload videos up to 15 minutes in length. You can attain the ability to upload longer length videos if:
- Your account is in good standing, as determined by the YouTube Community Guidelines.
- You verify your account with a mobile phone.
- Your account has no worldwide Content ID blocks on any content.
On the upload page, click the link to Increase your limit to be prompted to verify your account. Learn more here about longer length uploads.
Upload
Click the large red icon, or the button to Select files from your computer. This will open a menu where you can choose which file you want to upload. Once you have located the file, select Open to begin the upload. Alternatively, you can simply drag files from your computer and drop them on the page to begin an upload.Upload multiple files
Begin by clicking Select files from your computer. This will open the menu in which you will select your file. To select multiple files, hold down your Command key while selecting the files. On some keyboards, the Command key is the same as the Apple key or the Windows key. All the videos you intend to upload should be highlighted. Once you have completed this, click the Open button.
Record from webcam
Click this box to begin directly recording a video using your webcam, or simply go to www.youtube.com/my_webcam.
 You must do the following to ensure that the YouTube Record from webcam feature works:
- Log into your YouTube account
- Ensure that you have a working webcam built into or connected to your computer
- Select allow if asked to permit YouTube to access your camera and microphone
Once you have followed these steps, you can begin to record your video and then upload it to YouTube directly. See here for more information on recording and uploading webcam videos.
Supported YouTube formats
Here is a list of some well-known formats that YouTube supports:
- WebM files - Vp8 video codec and Vorbis Audio codecs
- .MPEG4, 3GPP and MOV files - Typically supporting h264, mpeg4 video codecs, and AAC audio codec
- .AVI - Many cameras output this format - typically the video codec is MJPEG and audio is PCM
- .MPEGPS - Typically supporting MPEG2 video codec and MP2 audio
- .WMV
- .FLV - Adobe-FLV1 video codec, MP3 audio
Here is a list of some common formats that YouTube does NOT support:
- Project files: No project files of any kind are acceptable. It is generally very easy to convert project files to a supported format.
- MSWMM and WLMP: You can easily convert these project files to .WMV.
- Audio files (MP3, WAV, etc.) and Image files (JPG, PNG, etc.): Convert these files to video slideshows.
Tips and notes:
- We prefer that you upload your video in the original format and in the highest quality possible.
- We prefer de-interlaced files.
- Audio and video lengths should be the same and audio should begin at the same time as the video.
- If you continue to experience Audio/Video issues with your upload, contact us and we may be able to help.
I'm using Windows Movie Maker. Why won't my video upload?
If you are using Windows Movie Maker or Windows Live Movie Maker and experiencing errors with your uploads, it is possible that you are attempting to upload a project file, which is not an actual movie file. You can follow the simple steps outlined below to convert your video project to a .wmv file, which is an acceptable format for upload.
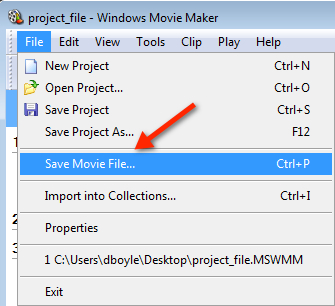
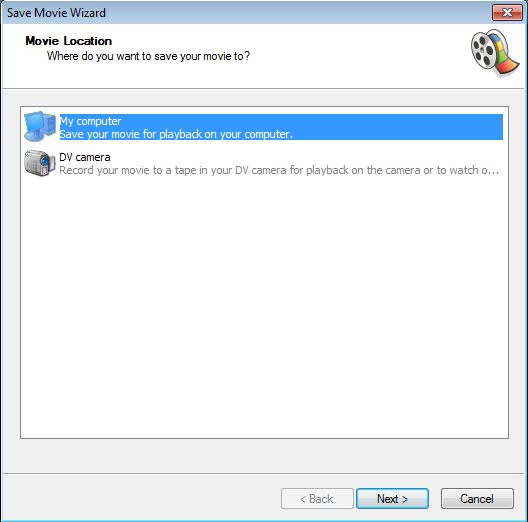
Click File and then select Save Movie File from the dropdown. In the next step, select My Computer as your saving destination, and then click next.
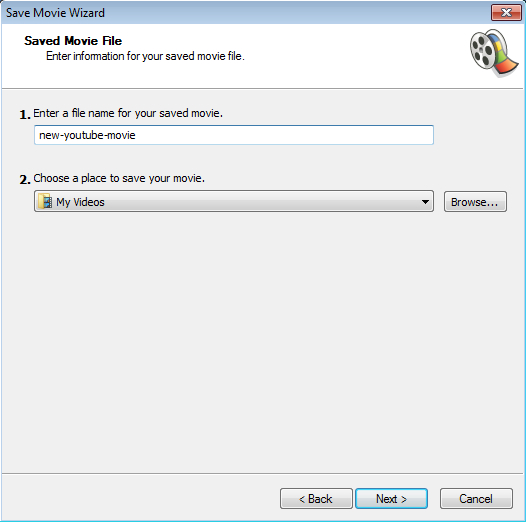
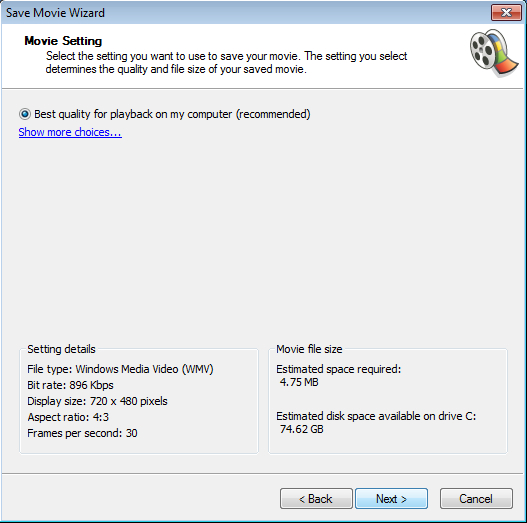
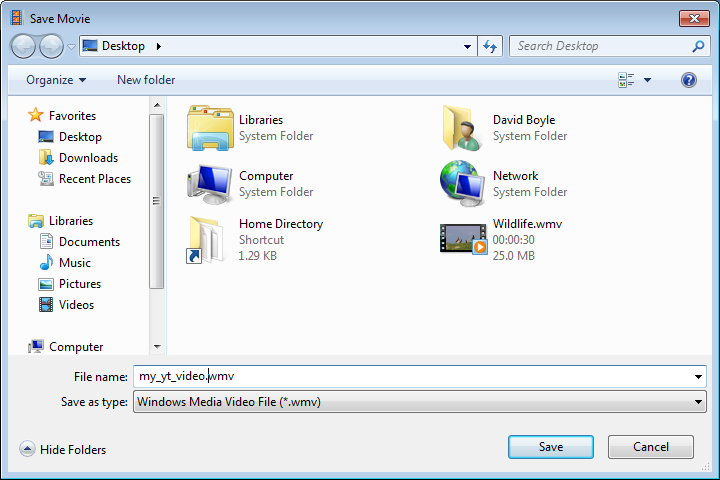
Enter a name for your file, and then choose a place to save your movie. In the next step, click Next to start encoding your video with default settings. If you would like to make more advanced adjustments to the file, you may also select Show more choices.
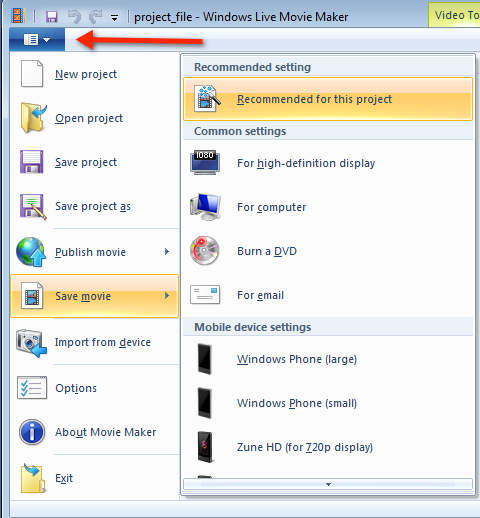
Click the File tab in the upper-left hand corner, and then select Save Movie from the dropdown, then choose Recommended for this project. Next, choose your saving destination, provide a name for your movie, then click Save.
Windows Movie Maker: Converting .MSWMM
If you edited your video using Windows Movie Maker, you may have also attempted to upload a .MSWMM project file. You can convert this project to .wmv format by following these steps:Click File and then select Save Movie File from the dropdown. In the next step, select My Computer as your saving destination, and then click next.


Enter a name for your file, and then choose a place to save your movie. In the next step, click Next to start encoding your video with default settings. If you would like to make more advanced adjustments to the file, you may also select Show more choices.


Now that you have completed these steps, select the .wmv file that you created, and upload it to YouTube.
Windows Live Movie Maker: Converting .wlmp
If you edited your video using Windows Live Movie Maker, you may have also attempted to upload a .wlmp project file. You can convert this project to .wmv format by following these steps:Click the File tab in the upper-left hand corner, and then select Save Movie from the dropdown, then choose Recommended for this project. Next, choose your saving destination, provide a name for your movie, then click Save.


Now that you have completed these steps, select the .wmv file that you created, and upload it to YouTube.
Download Link=>>>Windows-live/movie-maker-get-started (Free )
How to ensure proper Audio/Video sync through a QuickTime conversion
MOV/MP4 files exported from programs such as iMovie, Final Cut Pro, and QuickTime Pro ($ 29.99) have certain elements that are not handled well by YouTube transcoding. In order to ensure optimal upload quality--and specifically that the Audio and Video of the file remain in sync--use the encoding settings outlined below.
Export your video using QuickTime
- In iMovie, select Share > Export Using QuickTime
- In Finalcut Pro, select File > Export > Using Quicktime Conversion >Options
- In QuickTime Pro, select File > Export > Export: Movie to QuickTime Movie > Options
Alter your video encoding
- Enter a name for your file, and select Movie to QuickTime Movie from the Export dropdown.
- Click Options and make the following changes to Video settings:
- Compression Type: H.264
- Frame Rate: 30 is preferred. 23.98, 24, 25, 29.97 are also acceptable.
- Data Rate: Automatic
- Key Frames: Automatic
- Frame Reordering: Unchecked


- Make the following changes to Audio or Sound settings:
- Format: AAC
- Click Show advanced settings and choose Constant Bit Rateas encoding strategy.
- Select Size and choose the original size of the video.
- The section Prepare for Internet Streaming must be set to Fast Start.
- Save your video, and then upload the resulting file to YouTube


Credit@THANHAN(ASNGROUP)
No comments:
Post a Comment