Managing Permissions via Finder
A significantly redesigned Finder was one of the major new features in the previous Mac OS X v10.5. This included a new interface for managing ownership and permissions from the Finder’s Get Info window. The redesign was necessary to incorporate support for ACLs. As covered previously in this chapter, the Finder uses the ACL architecture so you can configure unique privileges for an unlimited number of users or groups.
You may find that while the Finder makes permissions management simple, it does so through a form of obfuscation. In other words, the Finder hides the complexity of permissions by intentionally misrepresenting the full permissions of an item. If you’re more comfortable with traditional UNIX-style permissions, or you simply require full access to an item’s permissions, then you’re best served by managing permissions via the command line as covered later in this chapter. However, for the most common permissions settings, the Finder’s simplified permissions interface is still the quickest and easiest solution.
Modifying File Permissions via Finder
To change permissions in the Finder:
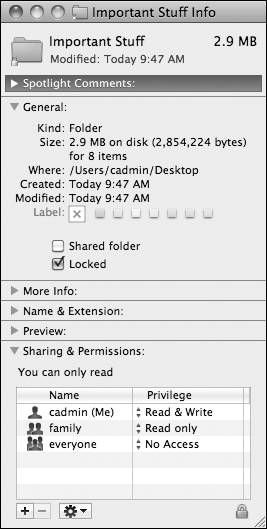
- In the Finder, select the file or folder for which you wish to change the permissions, and then open the Get Info window.
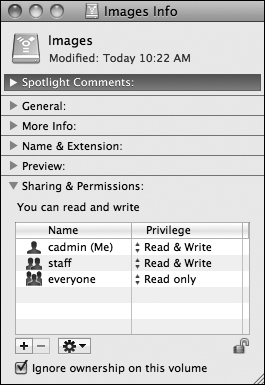
- Once you have opened a Get Info window, click the Sharing & Permissions disclosure triangle to reveal the item’s permissions.
- Click the small lock icon in the bottom-right corner of the Get Info window and authenticate as an administrative user or the owner of the item to unlock the Sharing & Permissions section.
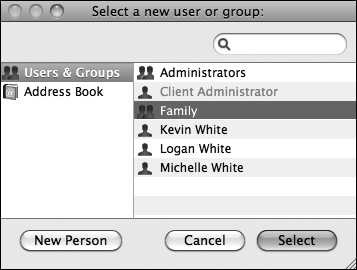
- To add new users or groups, click the small plus button in the bottom-left corner of the Get Info window.A dialog will appear, allowing you to select a new user or group. To select an existing user or group, choose his or its name from the list and click the Select button. Alternately, you can create a new Sharing user account by clicking the New Person button or selecting a contact from your Address Book. Creating a new Sharing account in either case requires that you also enter a new password for the account.
- To delete users or groups, select the account from the permission list and click the small minus button in the bottom-left corner of the Get Info window.
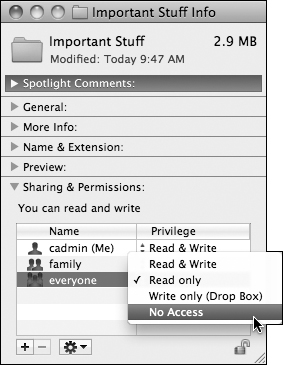
- To assign different privileges, simply click on any privilege and a pop-up menu will appear, allowing you to choose another access option for that user or group. Details about the privilege options available from the Finder are covered previously in this chapter.
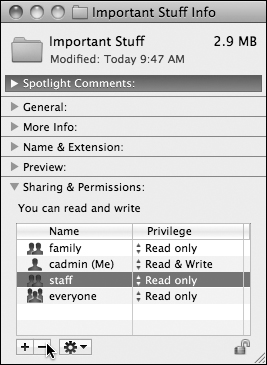
- If you are changing the permissions of a folder, by default, the Finder will not change the permissions of any items inside the folder. In many cases, you will want to apply the same permissions to the items inside the folder.You can accomplish this quickly by clicking the gear button at the bottom of the Get Info window to reveal the Action pop-up menu, and then choosing the “Apply to enclosed items” option from this menu.
- Changes made using the Get Info window are applied immediately. When you are done making ownership or permissions changes, close the Get Info window.


As long as you keep the Get Info window open, the Finder will remember the original permissions setting for the item. This is useful for testing different permissions configurations, as you can always revert to the original permissions setting. To do so, click the gear button at the bottom of the Get Info window to reveal the Action pop-up menu, and then choose the “Revert changes” option from this menu.
Managing Locked Items via Finder
Mac OS X includes a special file and folder attribute that trumps all write privileges and even administrative user access. Users can choose to lock a file or folder that they own from the Finder’s Get Info window. Locking an item will render it completely unchangeable to all users except the item’s owner. Even administrative users are prevented from making changes to another user’s locked file in the graphical interface. In other words, a standard user could potentially lock an item that the administrative user would have no ability to change in the graphical interface.
To lock a file or folder in the Finder:
- In the Finder, select the file or folder you wish to lock, and then open the Get Info window.
- Once you have opened a Get Info window, click the General disclosure triangle to reveal the Locked checkbox.
- As long as you are the original owner of the item, you will be allowed to select the Locked checkbox.Changes made using the Get Info window are applied immediately.
Once an item is locked, no other users can modify, move, delete, or rename it. In the graphical interface the owner can modify the content of the item or delete it, but the Finder still prevents the owner from moving, renaming, or changing ownership and permissions of the locked item. In fact, if you as the owner try to move a locked item, the Finder will default to making a copy. The owner can return the file to the normal state by disabling the locked attribute from the Finder’s Get Info window. An administrative user can disable the locked attribute, but only via the command line, as covered later in this chapter.
Permissions for External Volumes
Portable external disk and flash drives are useful tools for transferring files and folders from one computer to another. A downside to this technology, though, is that computers can’t properly interpret file ownership because they don’t share the same user account database. In other words, most Macs don’t have the exact same user accounts, so when a drive is moved from one Mac to another, the file ownership from one Mac is meaningless to another.
Unless you plan to implement a centralized network user database so all your Macs do share the same user account database, ownership on external volumes will have to be ignored to prevent access issues. This is the default behavior on Mac OS X for all external volumes. Keep in mind, however, that this approach introduces the security risk that all local users will have full access to the contents of external volumes. Because some may find this an unacceptable security risk, you can disable the default behavior and force Mac OS X to honor ownership on external volumes.
To honor ownership on external volumes:
- In the Finder, select the external volume for which you wish the system to honor the ownership, and then open the Get Info window.
- Once you have opened a Get Info window, click the Sharing & Permissions disclosure triangle to reveal the item’s ownership and permissions.
- Click the small lock icon in the bottom-right corner of the Get Info window and authenticate as an administrative user to unlock the Sharing & Permissions section.
- Deselect the “Ignore ownership on this volume” checkbox.Changes made using the Get Info window are applied immediately.By Kevin M. WhiteRef:http://www.peachpit.com